Background

Sunday, June 27, 2010

Lemon Berry Semifreddo - by Lisa

First things first, mommy brain is clearly kicking into high gear as I made the wrong recipe this week. Fortunately, it is one that was scheduled for this month. I just flipped the weeks around. Ug.

At least the good news is that I got what I considered to be the "hard" one out of the way. This wasn't terribly difficult as far as skill level goes, but boy were there a lot of steps and prep involved! Oh and lots of dirty dishes - lots and lots. I generally like to clean as I go, and I couldn't keep up on this one! LOL!

For this recipe, we had an option for what kinds of berries to use. I opted for 1/2 blueberries, 1/4 strawberries and 1/4 blackberries. I already had the blueberries and strawberries on hand, so the only extra ingredients I had to get were the blackberries and whipping cream. Making this dessert while 7 months pregnant was an interesting experience. At this stage, I've recognized I need to take a lot of breaks from standing, and with all the steps in this recipe I wound up bringing a chair into the kitchen to give my back a break! I was also very thankful I have 2 Kitchenaid mixer bowls. This is the first time I've put them both to use for the same recipe! I'm also thinking twice about having no metal bowls (outside of the mixer bowls). Whenever I need to double boil something, I use the double boiler that I have. The problem with it tho is that it has a round bottom - I can't set it down flat on the counter which can be a pain sometimes. I managed to work around it today tho.

Whisking over the double boiler
Overall, it took me about 90 minutes to complete this recipe, and I'm glad I made it on a weekend day. I'm not confident I did everything right on the egg portion. While having it on the mixer, it never really doubled in volume, but I did seem to have enough to sufficiently fill the cups. I also ended up with about twice as much berry puree - not sure how that happened!

Beating the egg mixture while it cools
Folding together the whipped cream, berry puree and egg mixture

I let these set up in the freezer for about 6 hours. Sadly, I'm not sure I folded the cream, egg mixture and berries enough. They seemed to have the right texture and firmness, but something just didn't seem right. I could see an awful lot of the egg mixture (you can see it in the very first picture), and I felt like I could taste the sugar granules. I had the egg/sugar mix on the stove top for the full 10 minutes, but I don't think I was consistent enough in my whisking.

Hubby and I both thought the flavor of this was good and that it looked (mostly) like it should, but I don't think I'll try making this one again. It turned out well enough, but it was just a bit overwhelming with all the time and effort that went into it.

Blackberry Cobbler

 I was really excited to make this recipe.  On Saturday morning we set out to our local Farmer's Market.  I had hoped to purchase the blackberries there, but unfortunately there weren't any!  So I had to run to the grocery store to get them. 

This recipe was really easy and like the previous week - you let the fruit, in this case blackberries, hang out in sugar and tapioca for a few minutes which allows you the time to make the topping. 
In this case, the topping was biscuit-like.  I ended up having more topping than room in my pie plate.  While the recipe states plopping 6-8 tablespoons on dough on top of the blackberries, I could only fit 6.  Then I had to start adding more dough on top of the 6 piles that I had already made.  It didn't look particularly neat, but it didn't impact the taste at all.

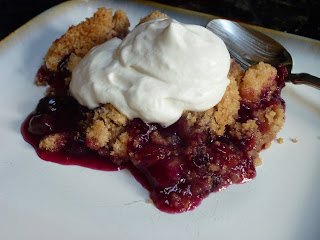
I almost used a combination of blackberries and raspberries, but I didn't.  If I were to make this again, I probably would use a few blackberries, but add raspberries, blueberries and even some strawberries to the mix.  We had friends over to help sample this on Saturday evening and while we all like the dessert, we agreed that blackberries weren't our favorite berry.  But the cobbler topping was a nice change from the crisps that I tend to make.  It's great to have other options for a quick and easy summertime dessert. 

Saturday, June 19, 2010

Nectarine-Blueberry Crisp - by Lisa

I am so excited for summer to finally be here because that means we can start focusing on the berry-centric recipes! Hooray!! (Altho, if you are up here in Seattle, you're probably questioning if summertime is really here given the terrible weather we've been having!) For this month, we selected mainly fruit focused recipes, and starting us off is the Nectarine-Blueberry Crisp. My husband absolutely adores blueberries, and my son is turning into a blueberry monster as well. :) I figured this recipe would definitely be a hit in our household.

Like a few of the other recipes we've completed so far, this one is less mixing and more assembling with a little extra fruit prep thrown in. One thing I didn't account for was having slightly overripe nectarines. This made for quite the challenge in splitting them and extracting the pits. Fortunately, these end up on the bottom layer of the dish, so I didn't have to worry about all of the slices looking picture perfect. Believe me, there was some minor cussing as I had more than one nectarine go to mush in my hands as I tried to pry it apart! Apart from that, the rest of the recipe was very easy to put together.

I baked it for 57 minutes and was amused to find that about 1/3 - 1/2 of the topping got absorbed by the fruit filling. It almost looks like I forgot to add the topping to those parts! I really appreciated Beth's instruction to place the baking dish on a foil lined pan - no mess in the oven from any overzealous blueberries!

I opted to serve this with homemade whipped cream as we're attempting to scale back a wee bit on the amount of ice cream consumed in this household. But I can only imagine that this would be equally yummy with a scoop of French vanilla on top! Hubby devoured his piece in about one minute and had to refrain from licking the plate clean. I thought it was delicious as well! A nice refreshing summertime treat!

I'm guessing you could substitute just about any fruit in this recipe and it'll still turn out fantastic! I am looking forward to making it again sometime!

Friday, June 18, 2010

Nectarine-Blueberry Crisp - by Summer

This was a first for me - I ran out of sugar today!  Seriously - how does one just run out of sugar?!  Especially a regular baker like me?  I suppose it's not that strange given the fact that I have been sick this week.  On Sunday my husband did our weekly grocery shopping instead of me, and typically I would have caught it (or not). 

Anyhow my darling little baby had me up early today, so at 6 am I decided to finally make this week's recipe.  I was measuring out the ingredients and discovered I was less than 1/8 of a cup short on sugar!  I was tempted to pack the baby in the car and run out to the store, but my husband's car was blocking mine (I can't drive stick)!  I finally got the sugar late today and was able to complete the recipe.

This is a quick and tasty dessert.  I love the combination of the nectarines and blueberries, although it would have never occurred to me to combine the two into a crisp!  The thickening agent is tapioca, which I have never baked with before.  I am intrigued now by Tapioca Pudding and may even have to try it. 

I was being lazy when I made this recipe, so instead of dragging out the food processor to make the topping, I just used my pastry blender.  I am not sure if that made a difference or not.  The topping didn't seem like a typical crisp topping.  Maybe one of the reasons is I usually use quick oats in my crisp toppings.  I think in the future I would probably add them as well. 
My crisp took 60 minutes to bake.  I tasted this while it was still warm and it was amazing.  This is the perfect time of year for this dish and I definitely will be making this again!

Sunday, June 13, 2010

Chocolate-Chocolate Chip Cupcakes - by Lisa

This was a really quick and easy recipe to throw together! I didn't have to buy any special ingredients, and the only help I required was for my hubby to brew the coffee for me. I was a little concerned that I had messed up the butter/sugar step by not beating it long enough. The batter was really gritty and it just looked like the butter wasn't incorporated enough. You can kind of see it in this picture.


But once the flour mixture was added in and they came out of the oven, they looked great! I baked them exactly 20 minutes which seemed to be just right. They were very slightly crisp on the outside and moist on the inside. I opted to top them with a dusting of powdered sugar per Beth's suggestion which I thought was great. Tho when hubby saw Summer's version, he was jealous of the chocolate frosting on hers! He still liked mine just fine tho.

Times like this one are when I really wish I liked coffee. :( Living in Seattle and being a non-coffee drinker is quite the unusual combination! These cupcakes would have been very tasty for me if they didn't include brewed coffee in the recipe. I was pretty certain that all I'd want to take is one bite. To my initial surprise, I didn't taste the coffee flavor at first, so I got to enjoy the taste and texture of the cupcake. But a few moments after swallowing my bite, the coffee aftertaste came on pretty strong. Regular coffee drinkers won't likely notice the aftertaste, but I could definitely tell it was there. It's ok tho, my hubby will be the hero of his office tomorrow morning when he brings them all in to share. :)

Chocolate-Chocolate Chip Cupcakes - by Summer

This week's recipe was specifically requested by my friend Matt who so enjoyed the Dark Chocolate Pudding.  He was flipping through the cookbook that night and saw these cupcakes.  Since he loves all things chocolate, he definitely wanted to try these.  I knew that we were going to see him this weekend, so I purposely picked to make the cupcakes this week.

Probably the most difficult thing about this recipe is brewing the coffee.  In fact, after I got started with the recipe, I thought that I should have doubled it.  But since the butter and eggs needed to sit out to room temperature and I was short on time on Friday, I just went with the original recipe amounts. 

I did end up with more than just 12 cupcakes (I had 16 total) and I didn't think to adjust the baking time.  In hindsight I should have probably only had them bake for about 16-17 minutes instead of the 18 minutes.  They still were super tasty, but just a tad bit dry for me. 

As I mentioned earlier, I was running short on time, so after debating about how to frost these, I sent my husband to the store for canned frosting.  I picked chocolate because why not make them as rich as possible?  Beth's suggestion in the cookbook to just dust them with powdered sugar, and in the future I think I will.  The cupcakes are very strong in flavor.  I could taste the coffee in them, but I like coffee, so that's not a bad thing.  I look forward to baking these again in the future! 

And as for Matt - he thought these were great!

Thursday, June 3, 2010

Zucchini Bread - by Summer

I am heading into a busy, but very fun weekend.  Not only is Lisa and her family coming to visit, but we'll be taking a road trip down to my parents in WI for my little guy's Baptism this weekend!  I promised my mom that I would bring this bread with me, but I also wanted to taste it, so I could blog about it before I left.  What to do?  Then I remembered Mini Loaf Pans! 

I have these mini loaf pans and used three of them instead of one big one.  So I am able to sample one of the loaves and bring the other two with us for the weekend.

The recipe was super simple.  I had planned on using my mixer with the whisk attachment, but my little guy was sleeping and I decided to do it old school and mix everything by hand.  Fortunately it was pretty simple and the mini loaves baked for about 45 minutes.  I really wish we had planted zucchini in our garden this, because this is a great recipe for zucchini.  I will definitely be making this one again!

Tuesday, June 1, 2010

Zucchini Bread - by Lisa

I got my recipe done early this week because this weekend I'll be hanging out with Summer! Yay!! I also had hoped to enjoy this bread with my sister before she flew back to Chicago. But alas, the morning got away from me and while we couldn't sit down and enjoy it together, I was able to send a slice along with her on her flight. I hope she finds it as tasty as I did! I couldn't wait to get back home and try a slice. :) I wasn't disappointed! It was just as yummy as I'd hoped it would be!

The bread has a nice firm texture that is still quite moist but doesn't fall apart when you bite into it. The cinnamon flavor is just right and the whole thing pairs nicely with a glass of cold milk. :)

One thing I particularly liked about this recipe is that the only extra ingredient I needed was a zucchini. I got a medium sized one which yielded about 1 1/2 cups grated - more than enough! It would be particularly nice if I were growing my own zukes - then I would always have one in the summer! LOL! This was a really easy bread to make - the hard part was waiting for it to finish baking! Mine took about 72 minutes in the oven. I am looking forward to keeping this recipe handy - it is a definite keeper!