Background

Tuesday, October 30, 2012

Happy Halloween Again! - by Lisa

I'm totally going to copy Summer on this post because, well....I got nuttin'. I just haven't been making any new dessert recipes lately despite being busy with quite a bit of baking. :( I hope next month I can do a better job.

So this is my third round of spiderweb cookies in the last three weeks. I found this giant (seriously, giant - 7 inch diameter!) spider web cookie cutter while shopping for a different shape. It even came with a little spider cutter, but I didn't have enough dough for them this time around. I was going to use these as little gift treats for Caiden's class (yes, apparently I'm turning into "that" classroom mom), but they were even too big for the treat bags! I hemmed and hawed over what to do since I really wanted to make these cut outs, and finally split the difference. I went the "old school" route for the classroom treats and made 4 big ones for us to enjoy at home. Yay win!


"You are getting sleepy....very very sleepy...."
 Since I still had leftover treat bag decorations from the bake sale last week, I put those to good use on these treats! On the back I have a "to/from" sticker. I hope the kids get a kick out of these cookies! :)


Hope you have a safe and happy Halloween this year!

Thursday, October 25, 2012

Happy Halloween!

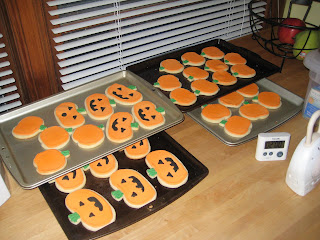
It's been a busy week for me, so unfortunately I just can't come up with a recipe to post here.  Instead - here is a picture of some cookies that I made for a couple of Halloween parties that are coming up.  Hope you have a great Halloween and I promise to have a great recipe for next week!


Thursday, October 18, 2012

Cranberry Muffins - by Summer


One of my favorite foods is in season during fall - cranberries!  I love cranberry juice and I love making whole cranberry sauce for the holidays (true story, until I was in high school, I thought the only kind of cranberry sauce was that jellied stuff that came in a can - I still love that too!)  Anyhow - I purchased a bag of cranberries at my supermarket a couple of weeks ago and they have been sitting in my fridge ever since.  Finally a few days ago I decided to make some muffins with half of them.  This recipe is from my mom, again and it makes a lot.  When looking at recipes for cranberries, I discovered that most of them call for dried cranberries, but these do call for the whole fresh ones!  I bet they would taste even better with some white chocolate chips thrown in too!

Cranberry Muffins - recipe from JoAnne Blume

1 1/2 cup cranberries (cut berries in half)
1 cup powdered sugar
4 cups flour
6 teaspoons baking powder
1 teaspoon salt
1/2 cup sugar
2 eggs beaten
2 cups milk
1/2 cup melted unsalted butter

Toss cranberries with powdered sugar and set aside. Sift dry ingredients together in a large bowl. Make a well in the flour mixture and add eggs, milk, and butter all at once. Stir lightly until combined - do not beat! Fold in cranberries. Pour into greased muffin pan until cups are 2/3 full.  Bake at 350 for 30 minutes.

Instead of regular muffins, I made mini ones (they are easier for my kids to handle) and I also made one mini loaf. I sprayed the pans with cooking spray.  The muffins baked for 20 minutes and the mini loaf baked for 40 minutes.

Wednesday, October 17, 2012

Tuesday Tips: Icing Bags - by Lisa

I know, I know...it's Wednesday, but I had you for a second there, right? I have been doing a lot of baking this week, but sadly none of the recipes are new ones. I made chocolate chip cookies, cornbread, gingersnaps, decorated sugar cookies, and I will be making carrot cake and scones tomorrow and Friday. Why the baking bonanza? Well part of it was for meals/snacks around here, and the other part is that I'm am member of a philanthropic Mother's Club here, and their annual craft show/bake sale is this weekend. Club members are required to bake 4 items (and package them prettily as well), and I'd rather bake things I know than take a chance foisting off a new recipe on some unsuspecting patron. So that has left me in a bit of a bind for this week's entry.

After some pondering, I decided to post a helpful tip for working with royal icing. When decorating sugar cookies, you will likely burn through a lot of plastic disposable pastry bags. Sometimes it can be worth it to rinse them out and reuse them, but that can get to be a chore. Several months ago, I came across a brilliant idea on Pinterest to aid in this dilemma. By using this method, you can easily reuse the disposable pastry bags AND have less mess to clean up!

 Here's what you do:

First tear off a decent size piece of plastic wrap and lay it flat on the counter.

Next, plop your desired amount of icing in the middle.


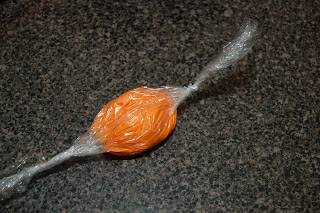
Wrap your icing so that it is sealed in the plastic and then twist the ends.
(I recently figured out it is extra smart to tie off the end you're squeezing from.)


Fold down your icing bag, insert the untied end of the plastic tube into the bag and pull out as much as you can thru the coupler.


Snip off the excess plastic, apply your decorating tip, and screw on the other half of your coupler.


Voila! You have a completely mess free pastry bag full of icing. When you are done decorating, simply remove your tip, carefully extract the plastic tube from the bag (from the wide end), and dispose. That's it!

Thursday, October 11, 2012

Chocolate Oatmeal Bars - by Summer

This recipe was one that I found recently in my dessert binder.  I have had it for quite some time - maybe 8 years - maybe longer. I can't remember why I thought to keep it and because at some point I typed it up, I have no idea where I got this recipe. I think I thought it was something different when I first saved it, but upon reading it thoroughly, I realized that these are pretty similar to the Crack Brownies, but with a a different base. I like the brownies better, but there is something about the combination of milk chocolate chips and peanut butter that is out of this world! I want to try tweaking these in the coming months.  My husband likes the idea of the brownie base, but no crunch (as in crunchy peanut butter or rice krispies). We'll see what I end up with.  Until then, give these a try if you liked the brownies.


Chocolate Oatmeal Bars
2/3 cups butter, softened
1 cup packed brown sugar
1/3 cup corn syrup
1 teaspoon vanilla
4 cups quick-cooking oats
1 package milk chocolate chips
2/3 cup chunky peanut butter
4 Heath candy bars, crushed*

In a mixing bowl, cream the butter and brown sugar. Add corn syrup and vanilla; beat well.  Stir in oats; press into a greased 12x9 inch baking pan.  Bake at 350 for 12-15 minutes or until golden brown.  Cool on a wire rack. 

In a microwave, melt chocolate chips and peanut butter; stir until blended.  Spread over cooled bars.  Sprinkle with crushed candy bars.  Refrigerate until set before cutting.

*I omitted these because I didn't have any on hand.

Tuesday, October 9, 2012

M&M Peanut Butter Bars - by Lisa

I'm always on the lookout for quick and easy yummy recipes. After I saw a friend post these on Pinterest, I knew I had to try them! The best part about this recipe is the super simple ingredient list - 5 items!! That's it!! Even a 4 1/2 year old can make 'em! :D


It's also customizable. Prefer peanut M&Ms? Go for it! How about some Reese's Pieces? Delish! Butterscotch chips? Why not! Maybe try some Nutella instead of peanut butter. You get the idea. :)

I forgot to take more pictures before these were devoured. In, like, a day!

Anywho, here is the recipe slightly adapted. I apologize in advance for expanding your waistline. :)

M&M Peanut Butter Bars
adapted from Rachel Cooks

Ingredients:
3/4 cup peanut butter (I used creamy)
2 large eggs
1 cup packed dark brown sugar
2 cups all-purpose baking mix (Bisquick, for example)
1 bag of M&Ms (Regular M&Ms; ~12 oz bag)

Directions:
1. Preheat oven to 325*F. Spray a 7 x 11 pan with cooking spray.
2. Combine peanut butter and eggs until well mixed and smooth.
3. Add in brown sugar and stir until combined.
4. Stir in baking mix until moistened.
5. Fold in M&Ms. I had to use my hands for this part. And then also had to push in some stray M&Ms.
6. Spread mixture in greased pan and bake for 30-35 minutes or until golden brown.

Thursday, October 4, 2012

Kolacky’s - by Summer

 Today is my dad's birthday! I blame him for my love of all things sweet. But I suppose that isn't really a bad thing. He's a pretty funny guy who enjoys a good joke or a good story. In honor of his birthday I thought I would feature a very tasty cookie - the Kolacky. It's a pastry filled with fruit. I remember helping my mom make these as a child. My mom says they are a lot of work, and while they do have a few steps, I don't think it's anymore work than cut-out cookies - and compared to the decorating that Lisa and I have been doing with Royal Icing, these are quite simple!


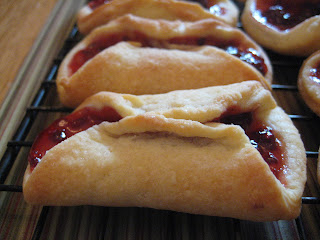
The most important step is to pinch them tightly.  It's hard because just when I thought they were were really sealed well, I looked in the oven and they had popped open.  But no worries, open or tightly closed, these little cookies are delicious! I made a half recipe and yielded almost 6 dozen (although, sorry Dad, we won't be bringing that many to you tomorrow!)

Kolacky’s - Recipe from JoAnne Blume

4 sticks butter (soften)
4 (3 oz) pkg cream cheese (soften)
4 Tbs sugar
4 C flour
4 tsp baking powder
4 beaten eggs
2-3 cans of Solo fruit filling (or pie filling - I didn't use the Solo brand)

Cream butter & cream cheese; add sugar & mix. Sift flour with baking powder. Add to mixture and mix well. Add eggs and blend well. Chill. Place on flour dusted board (can also sprinkle a little granulated sugar to help with the sticky dough). Divide dough into fourths. Roll out thin and cut with cookie cutter. Fill with teaspoon (or a little less depending on size of cookie cutter you use) fruit filling. Fold sides together on top and press together. Bake 15-18 min at 400 degrees. Sprinkle w/powder sugar when cool.